4-Ingredient Cottage Cheese Chocolate Mousse Recipe
Introduction
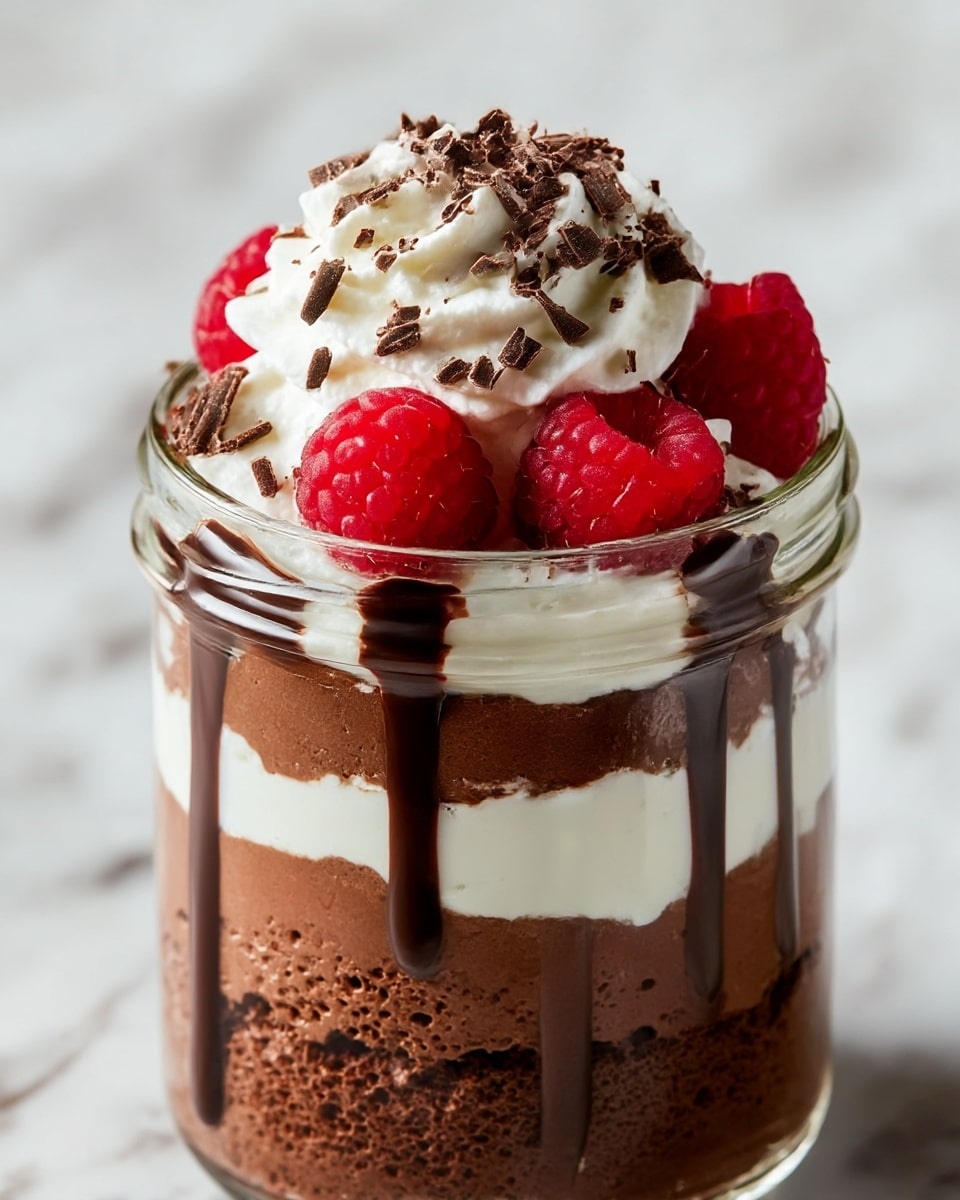
This 4-Ingredient Cottage Cheese Chocolate Mousse is a quick, creamy dessert that satisfies your chocolate cravings without complicated ingredients. With just a few pantry staples, you can whip up a silky mousse that’s both healthy and indulgent.
Ingredients
- 1 cup cottage cheese
- 2 tbsp cocoa powder
- 2–3 tbsp maple syrup or honey
- 1 tsp vanilla extract
Instructions
- Step 1: Add cottage cheese, cocoa powder, maple syrup (or honey), and vanilla extract into a blender or food processor.
- Step 2: Blend the mixture until smooth and creamy. Pause to scrape down the sides to ensure everything is fully combined, then blend again.
- Step 3: For a thicker mousse, chill it in the refrigerator for about 30 minutes.
- Step 4: Spoon the mousse into serving dishes and top with optional shaved chocolate, fresh berries, or a dollop of whipped cream if desired. Serve immediately and enjoy.
Tips & Variations
- Make sure to blend thoroughly to avoid a chunky texture and achieve a silky mousse.
- Adjust sweetness to your taste, as cocoa powder is naturally bitter without enough sweetener.
- If you prefer, substitute Greek yogurt for cottage cheese for a slightly different texture.
- Add a spoonful of almond or peanut butter for a nutty flavor twist.
- Use plant-based cottage cheese or thick coconut yogurt for a vegan version.
- For extra chocolate richness, blend in melted dark chocolate chips.
Storage
Store leftover mousse in an airtight container in the refrigerator for up to 2 days. Give it a quick stir before serving. The mousse may thicken further when chilled—if it becomes too thick, let it sit at room temperature for a few minutes to soften or add a splash of milk and stir.
How to Serve

Serve this delicious recipe with your favorite sides.
FAQs
Can I use regular yogurt instead of cottage cheese?
Yes, Greek yogurt can be used as a substitute. The texture will be slightly less fluffy but still creamy and delicious.
Is this mousse suitable for a vegan diet?
You can make a vegan version by using plant-based cottage cheese or thick coconut yogurt and replacing maple syrup or honey with a vegan sweetener like agave or maple syrup.
Print4-Ingredient Cottage Cheese Chocolate Mousse Recipe

This 4-Ingredient Cottage Cheese Chocolate Mousse is a quick, creamy, and healthy dessert that combines the protein-packed goodness of cottage cheese with rich cocoa for a silky, mousse-like treat. With just four simple ingredients and no complicated powders or additives, it’s perfect for anyone looking for a fuss-free, chocolatey indulgence that can be whipped up in minutes and customized with your favorite toppings.
- Prep Time: 5 minutes
- Cook Time: 0 minutes
- Total Time: 5 minutes (plus optional 30 minutes chilling)
- Yield: 2 servings 1x
- Category: Dessert
- Method: Blending
- Cuisine: American
- Diet: Low Fat
Ingredients
Base Ingredients
- 1 cup cottage cheese
- 2 tbsp cocoa powder
- 2–3 tbsp maple syrup or honey (adjust to taste)
- 1 tsp vanilla extract
Optional Toppings
- Shaved chocolate
- Berries (such as raspberries or strawberries)
- Whipped cream
Instructions
- Blend It Up: Place the cottage cheese, cocoa powder, maple syrup (or honey), and vanilla extract into a blender or food processor. Blend on high speed until the mixture becomes silky smooth and mousse-like.
- Scrape and Smooth: Stop blending and use a spatula to scrape down the sides of the blender to incorporate all of the cocoa powder. Blend again until fully smooth and creamy with no lumps remaining.
- Chill (Optional): For a thicker, more mousse-like texture, transfer the mixture to serving cups and chill in the refrigerator for at least 30 minutes. You can also enjoy it immediately if you prefer.
- Serve It Up: Spoon the mousse into individual dessert cups. Top with shaved chocolate, fresh berries, or a dollop of whipped cream if desired. Serve immediately and enjoy your healthy chocolate mousse.
Notes
- Blend thoroughly to avoid a chunky texture and achieve a smooth mousse consistency.
- Adjust the sweetness with maple syrup or honey to balance the natural bitterness of cocoa powder.
- Choose low-sodium cottage cheese to prevent a salty aftertaste in the mousse.
- Be mindful not to overload toppings to keep the dessert balanced and not overly sweet.
- For a vegan option, substitute with plant-based cottage cheese or thick coconut yogurt.
Keywords: cottage cheese mousse, chocolate mousse, healthy dessert, quick mousse recipe, 4-ingredient dessert, low fat chocolate mousse, easy chocolate dessert