No-Bake Peanut Butter Pie – Creamy & Easy Dessert Recipe
Introduction
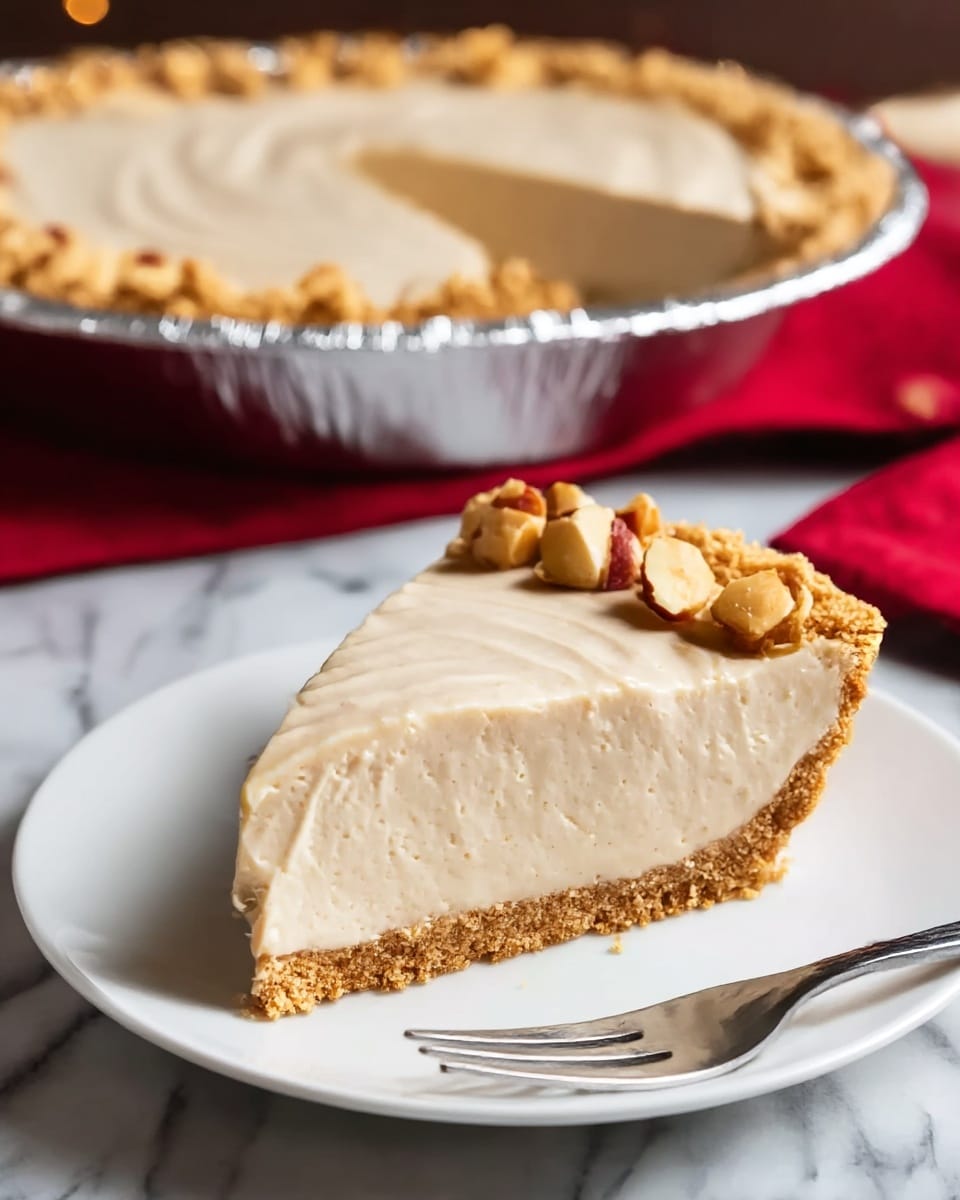
This No-Bake Peanut Butter Pie is a creamy and easy dessert perfect for any peanut butter lover. With a buttery graham cracker crust and a rich, smooth filling, it’s a no-fuss treat that impresses. Best served chilled, this pie offers a delightful contrast of textures and flavors.
Ingredients
- 1 ½ cups (150 g) graham cracker crumbs (or crushed digestive biscuits)
- 6 tablespoons (85 g) unsalted butter, melted
- 2 tablespoons (25 g) granulated sugar
- 1 cup (240 g) creamy peanut butter
- 8 ounces (225 g) cream cheese, softened
- 1 cup (120 g) powdered sugar
- 1 teaspoon vanilla extract
- 1 ½ cups (360 ml) heavy whipping cream (or 1 tub whipped topping)
- Optional toppings: shaved chocolate or mini chocolate chips, crushed peanuts, peanut butter drizzle, whipped cream
Instructions
- Step 1: In a medium bowl, mix together graham cracker crumbs, melted butter, and sugar until the mixture resembles wet sand.
- Step 2: Press the mixture firmly into the bottom and up the sides of a 9-inch pie dish. Chill in the fridge for at least 30 minutes while preparing the filling.
- Step 3: In a large mixing bowl, beat the peanut butter and softened cream cheese until smooth and creamy.
- Step 4: Add powdered sugar and vanilla extract, mixing until fully combined.
- Step 5: In a separate bowl, whip the heavy cream to stiff peaks. If using pre-made whipped topping, skip this step.
- Step 6: Gently fold the whipped cream into the peanut butter mixture until no streaks remain.
- Step 7: Spread the filling evenly into the chilled crust and smooth the top.
- Step 8: Refrigerate the pie for at least 4 hours, or overnight for best results, until firm and set.
- Step 9: Garnish with chocolate shavings, crushed peanuts, or a drizzle of melted peanut butter before serving.
Tips & Variations
- For a gluten-free option, use gluten-free graham cracker crumbs or substitute with crushed gluten-free cookies.
- If you prefer a lighter texture, substitute half of the heavy cream with whipped topping or use all whipped topping.
- Try adding a pinch of salt to the filling to enhance the peanut butter flavor.
- Freeze individual slices for a cool treat or make it ahead to allow flavors to meld.
Storage
Store the pie covered in the refrigerator for up to 3 days to maintain freshness and texture. If needed, it can be frozen for up to 1 month—wrap tightly before freezing. To serve after freezing, thaw in the refrigerator overnight and allow it to reach chilled firmness before slicing. Avoid leaving the pie at room temperature for extended periods, as the filling is cream-based.
How to Serve

Serve this delicious recipe with your favorite sides.
FAQs
Can I use crunchy peanut butter instead of creamy?
Yes, you can substitute crunchy peanut butter if you prefer added texture in your filling. It will add a slight crunch without affecting the overall creaminess too much.
Do I have to use heavy whipping cream, or can I use something else?
Heavy whipping cream is best for achieving the fluffy, light texture in the filling. However, you can use store-bought whipped topping as a convenient alternative, just skip the whipping step if you do.
PrintNo-Bake Peanut Butter Pie – Creamy & Easy Dessert Recipe

This No-Bake Peanut Butter Pie is the ultimate creamy and easy dessert for peanut butter lovers. Featuring a buttery graham cracker crust and a smooth peanut butter and cream cheese filling, this pie requires no baking and is chilled to perfection. The rich and silky texture pairs beautifully with optional toppings like chocolate shavings, crushed peanuts, or a peanut butter drizzle, making it an effortless yet impressive treat for any occasion.
- Prep Time: 20 minutes
- Cook Time: 0 minutes
- Total Time: 4 hours 20 minutes
- Yield: 10 slices 1x
- Category: Dessert
- Method: No-Cook
- Cuisine: American
Ingredients
For the Crust
- 1 ½ cups (150 g) graham cracker crumbs (or crushed digestive biscuits)
- 6 tablespoons (85 g) unsalted butter, melted
- 2 tablespoons (25 g) granulated sugar
For the Filling
- 1 cup (240 g) creamy peanut butter
- 8 ounces (225 g) cream cheese, softened
- 1 cup (120 g) powdered sugar
- 1 teaspoon vanilla extract
- 1 ½ cups (360 ml) heavy whipping cream (or 1 tub whipped topping)
Optional Toppings
- Shaved chocolate or mini chocolate chips
- Crushed peanuts
- Peanut butter drizzle
- Whipped cream
Instructions
- Prepare the crust: In a medium bowl, mix together graham cracker crumbs, melted butter, and granulated sugar until the mixture resembles wet sand. This will form the base of your pie.
- Form and chill the crust: Press the mixture firmly into the bottom and up the sides of a 9-inch pie dish to create an even crust layer. Place it in the refrigerator for at least 30 minutes to set while you prepare the filling.
- Mix the filling base: In a large mixing bowl, beat the creamy peanut butter and softened cream cheese together until the mixture is smooth and creamy without lumps.
- Add sweetness and flavor: Incorporate powdered sugar and vanilla extract into the peanut butter and cream cheese mixture, mixing until fully combined for a balanced sweetness.
- Whip the cream: In a separate bowl, whip the heavy cream until stiff peaks form. If you opt for pre-made whipped topping, you can skip this step.
- Combine whipped cream and filling: Gently fold the whipped cream into the peanut butter mixture carefully, making sure there are no streaks but maintaining a light, airy texture.
- Assemble the pie: Spread the creamy filling evenly into the chilled crust, smoothing the top with a spatula for a neat finish.
- Chill to set: Refrigerate the pie for at least 4 hours or preferably overnight to allow it to firm up completely and develop its signature creamy texture.
- Garnish and serve: Before serving, decorate with optional toppings such as chocolate shavings, crushed peanuts, a drizzle of melted peanut butter, or extra whipped cream to enhance flavor and presentation.
Notes
- The pie must be chilled for at least 4 hours to ensure it sets properly and achieves the right texture.
- If you prefer a lighter filling, whipped topping can be used as a substitute for heavy whipping cream.
- For a gluten-free option, use gluten-free graham crackers or substitutes in the crust.
- Store leftovers refrigerated and consume within 3-4 days for best freshness.
- Ensure cream cheese is softened to room temperature for easier mixing and a smoother filling.
Keywords: peanut butter pie, no-bake dessert, creamy peanut butter dessert, easy pie recipe, no-bake pie, peanut butter cream cheese pie