Crispy Rice Salmon Recipe
Introduction
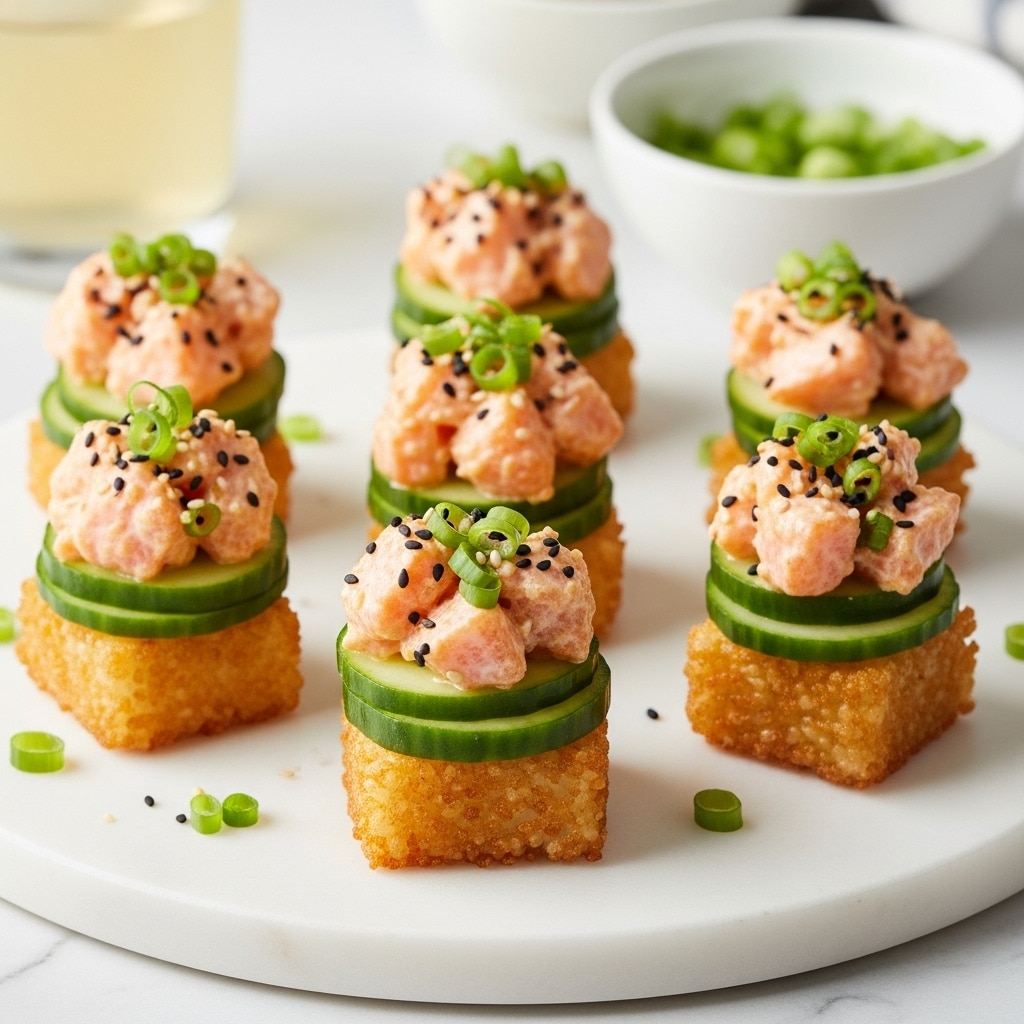
Crispy Rice Salmon is a delightful fusion dish combining perfectly seasoned sushi rice that’s pan-fried to a golden crisp, topped with fresh, flavorful salmon. This recipe offers a satisfying contrast of textures and bright, savory flavors that are sure to impress both sushi lovers and home cooks alike.

Ingredients
- 1.5 cups dry short grain sushi rice, rinsed until water is clear
- 2 cups water
- 1 teaspoon salt
- 3 tablespoons rice vinegar
- 1 tablespoon granulated sugar
- 1 teaspoon toasted sesame oil
- 1 pound sushi-grade salmon
- 3 tablespoons Kewpie mayonnaise
- 1 teaspoon yuzu kosho
- 1 teaspoon yuzu juice
- 1 tablespoon soy sauce
- 2 teaspoons sesame oil
- 2 cucumbers, halved and thinly sliced
- 2 tablespoons toasted sesame seeds
- 4 stalks green onion, chopped
- Vegetable oil (for frying)
Instructions
- Step 1: Rinse the sushi rice thoroughly 4 to 5 times until the water runs clear. Cook the rice with 2 cups of water in a rice cooker or on the stove according to package instructions.
- Step 2: In a small bowl, combine salt, rice vinegar, sugar, and toasted sesame oil. Stir until the sugar dissolves. Once the rice is cooked, transfer it to a large bowl and gently toss in the seasoning mixture until evenly combined.
- Step 3: Line a small square baking tray with plastic wrap. Press the seasoned rice into the tray to form a 1/2-inch thick square block. Wrap tightly and refrigerate for at least 3 hours or overnight to allow the rice to dry slightly and firm up.
- Step 4: After chilling, cut the rice block into bite-sized rectangles. Pat each piece dry with a paper towel to remove any moisture.
- Step 5: Heat 1/4 to 1/2 cup of vegetable oil in a medium skillet over medium-high heat until hot, about 30 seconds. Carefully place the rice pieces in the skillet, spacing them about 2 inches apart. Fry for approximately 2 minutes on each side or until both sides are golden brown and crispy. Transfer to a wire rack over a baking sheet to drain excess oil.
- Step 6: To prepare the salmon topping, mix Kewpie mayonnaise, yuzu kosho, yuzu juice, soy sauce, and sesame oil in a bowl. Cut the salmon into small cubes and gently toss with the sauce until coated.
- Step 7: Assemble by placing a portion of the salmon mixture on each crispy rice piece. Garnish with thinly sliced cucumber, toasted sesame seeds, and chopped green onion. Serve immediately for best texture and flavor.
Tips & Variations
- For extra flavor, sprinkle a pinch of furikake seasoning on the rice before frying.
- If you cannot find yuzu kosho, substitute with a small amount of chili paste mixed with lime juice.
- Use a non-stick skillet to prevent the rice from sticking while frying.
- Try topping the crispy rice with other seafood like spicy tuna or cooked shrimp for variety.
Storage
Store any leftover crispy rice cubes and salmon topping separately in airtight containers in the refrigerator for up to 2 days. Reheat the rice by briefly pan-frying to restore crispness, but avoid microwaving to keep it from becoming soggy. Assemble just before serving for the best texture.
How to Serve
Serve this delicious recipe with your favorite sides.
FAQs
Can I use regular white rice instead of sushi rice?
Sushi rice is preferred for its sticky texture, which helps the rice hold together and crisp up nicely. Regular white rice is less sticky and may not form firm cubes or achieve the same crispiness.
What can I substitute for Kewpie mayonnaise?
If you can’t find Kewpie mayo, use regular mayonnaise mixed with a small amount of rice vinegar for a similar tangy flavor and creamy consistency.
PrintCrispy Rice Salmon Recipe

This Crispy Rice Salmon recipe features perfectly seasoned sushi rice pressed into crispy, golden brown rectangles and topped with fresh sushi-grade salmon mixed with a tangy yuzu mayonnaise. Garnished with cucumber slices, toasted sesame seeds, and green onions, this dish delivers a delightful texture contrast and vibrant flavors inspired by Japanese cuisine.
- Prep Time: 15 minutes
- Cook Time: 25 minutes
- Total Time: 3 hours 40 minutes
- Yield: 4 servings 1x
- Category: Appetizer
- Method: Frying
- Cuisine: Japanese
- Diet: Halal
Ingredients
Sushi Rice
- 1.5 cups dry short grain sushi rice, rinsed until water is clear
- 2 cups water
- 1 teaspoon salt
- 3 tablespoons rice vinegar
- 1 tablespoon granulated sugar
- 1 teaspoon toasted sesame oil
Salmon Topping
- 1 pound sushi-grade salmon
- 3 tablespoons Kewpie mayonnaise
- 1 teaspoon yuzu kosho
- 1 teaspoon yuzu juice
- 1 tablespoon soy sauce
- 2 teaspoons sesame oil
Garnish
- 2 cucumbers, halved and thinly sliced
- 2 tablespoons toasted sesame seeds
- 4 stalks green onion, chopped
Instructions
- Prepare the Rice: Rinse the sushi rice thoroughly 4-5 times until the water runs clear to remove excess starch. Cook the rice with 2 cups of water either in a rice cooker or on the stovetop until fully cooked.
- Season the Rice: In a small bowl, combine salt, rice vinegar, granulated sugar, and toasted sesame oil, stirring until the sugar dissolves. Transfer the cooked rice to a large bowl and toss it with the seasoning mixture until well combined.
- Shape and Refrigerate the Rice: Line a small square baking tray with plastic wrap. Spread the seasoned rice evenly into the tray, pressing down firmly to form a compact 1/2-inch thick square block. Wrap tightly and refrigerate for at least 3 hours or overnight to dry out slightly, which helps with cutting and crisping later.
- Cut the Rice: Once chilled, unmold the rice block and cut it into bite-sized rectangular pieces. Pat each piece dry to remove any excess moisture or condensation.
- Pan-Fry the Rice: Heat about 1/4 to 1/2 cup of vegetable oil in a medium skillet over medium-high heat until hot (about 30 seconds). Carefully place the rice pieces in the skillet, leaving about 2 inches between each piece to avoid sticking. Fry for approximately 2 minutes on one side until golden brown, then flip and cook another 2 minutes until the other side is golden and crispy. Remove the rice pieces and drain on a wire rack over a lined baking sheet to remove excess oil.
Notes
- Rinsing the sushi rice multiple times is important to achieve the right texture for crispy rice.
- Chilling the rice block ensures it holds together when frying and results in a better crispy texture.
- Be cautious of oil splattering during pan-frying: keep a splatter guard handy or use long tongs.
- Sushi-grade salmon can be substituted with other fresh seafood like tuna or scallops if desired.
- For a healthier version, you can reduce the amount of oil used for frying, but the texture may differ.
Keywords: Crispy rice, sushi salmon, Japanese appetizer, pan-fried rice, sushi rice recipe, salmon sushi topping