Maple Cream Pie Recipe
Introduction
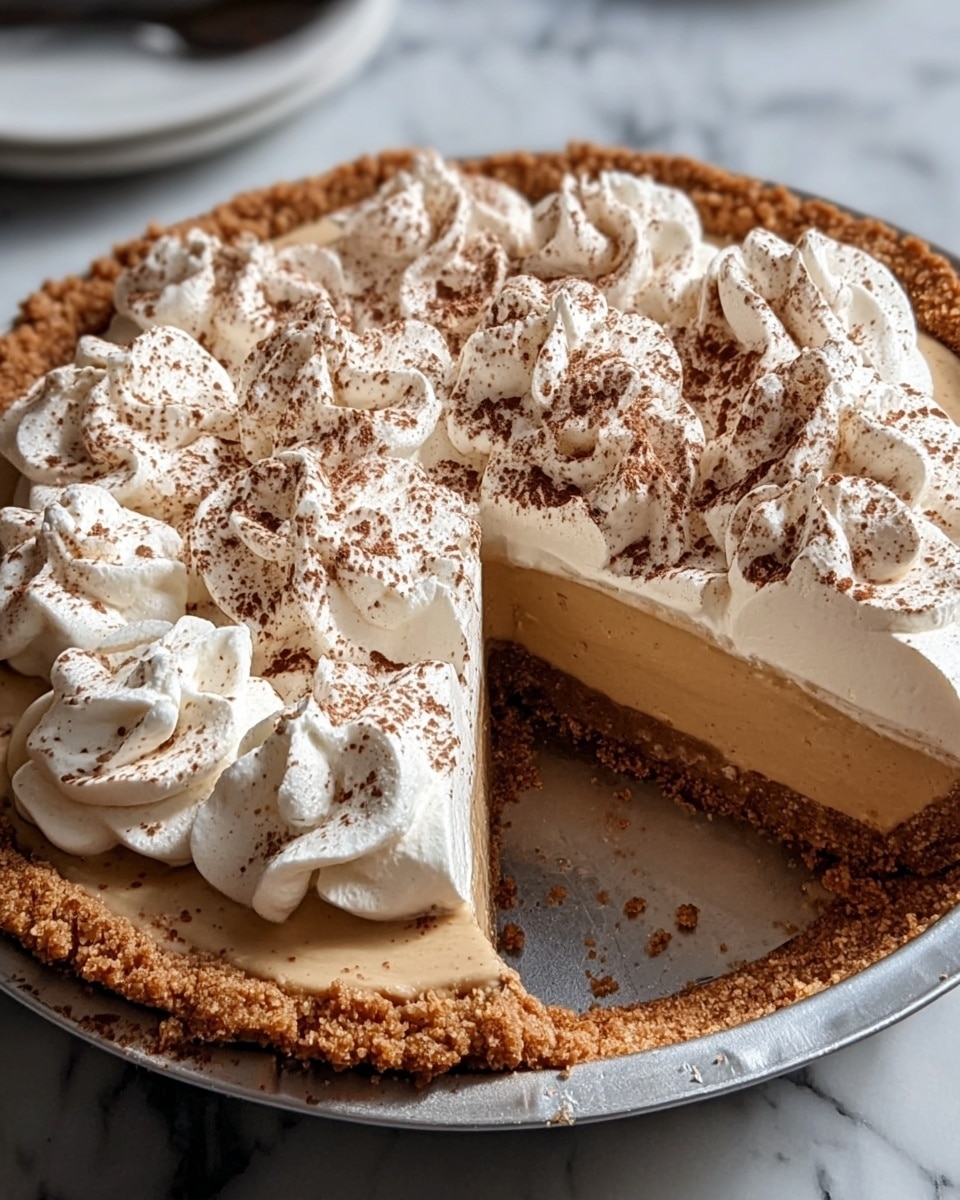
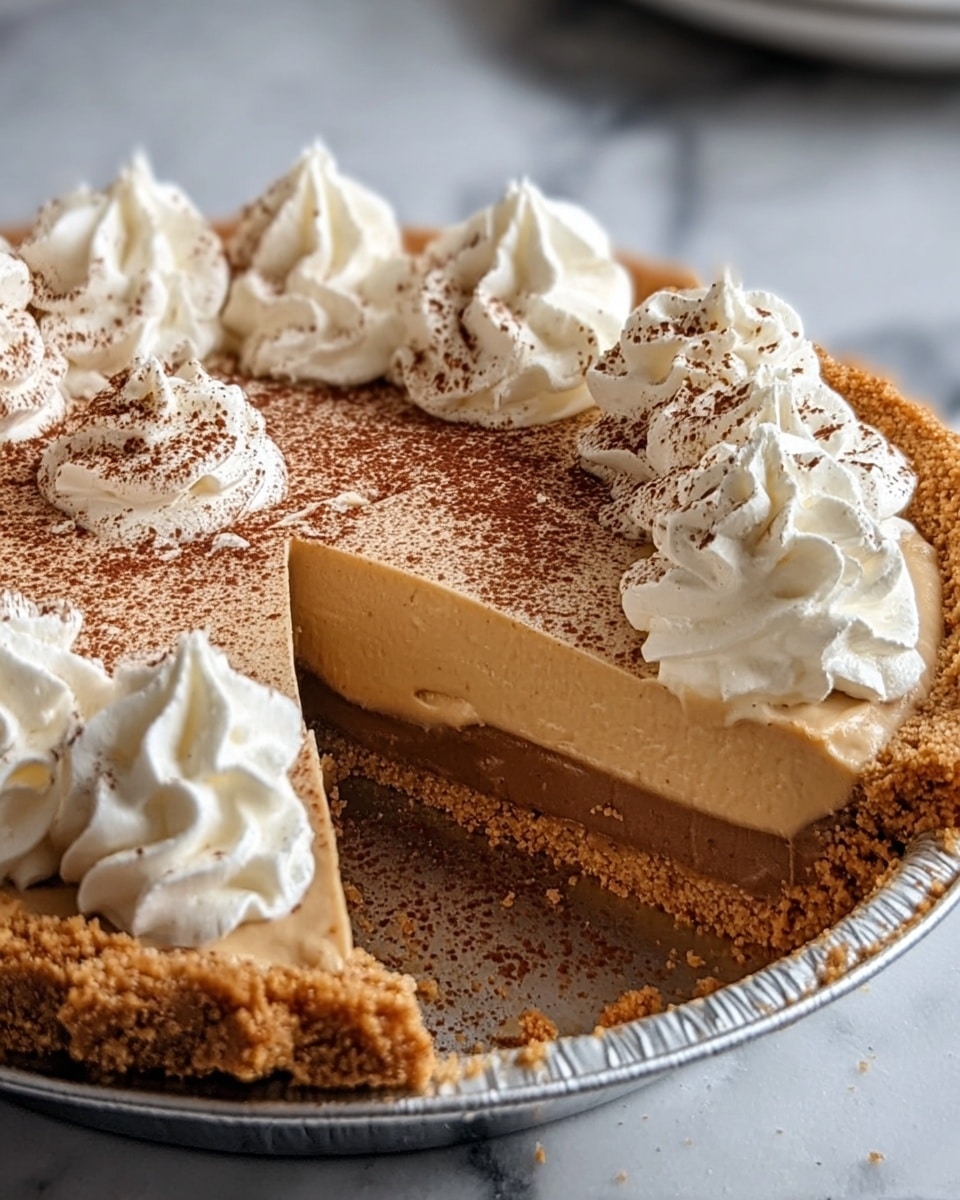
Maple Cream Pie is a rich and comforting dessert that combines a flaky, buttery crust with a silky, luscious maple-flavored custard filling. Topped with fluffy whipped cream, it’s perfect for cozy gatherings or special occasions. This recipe ensures a beautiful balance of sweetness and depth of flavor every time.
Ingredients
- For the All-Butter Pie Crust:
- 1 ½ cups (190g) All-Purpose Flour
- ½ teaspoon Salt
- ½ cup (113g) Unsalted Butter, very cold and cut into ½-inch cubes
- ¼ cup (60ml) Ice Water (add gradually as needed)
- For the Maple Cream Filling:
- ¾ cup (180ml) Pure Maple Syrup
- ¼ cup (50g) Granulated Sugar
- ¼ cup (30g) Cornstarch
- ½ teaspoon Salt
- 4 Large Egg Yolks, room temperature
- 2 cups (480ml) Whole Milk
- ¼ cup (60ml) Heavy Cream
- 2 tablespoons (28g) Unsalted Butter
- 1 ½ teaspoons Pure Vanilla Extract
- For Optional Whipped Cream Topping:
- 1 cup (240ml) Heavy Cream, very cold
- 1–2 tablespoons Powdered Sugar
- ½ teaspoon Pure Vanilla Extract
- (Optional) 1 tablespoon Pure Maple Syrup
Instructions
- Step 1: Prepare the pie crust by mixing the all-purpose flour and salt in a large bowl. Add the cold, cubed butter and use a pastry cutter or your fingers to work it into the flour until the mixture resembles coarse crumbs with pea-sized pieces of butter.
- Step 2: Gradually add ice water one tablespoon at a time, stirring gently with a fork until the dough just comes together. Avoid overworking. Form the dough into a ball, flatten into a disk, wrap in plastic, and chill for at least 1 hour.
- Step 3: Roll out the chilled dough on a lightly floured surface to fit a 9-inch pie pan. Transfer the dough to the pan, trim and flute the edges. Chill again while you prepare the filling.
- Step 4: For the filling, whisk together maple syrup, granulated sugar, cornstarch, and salt in a medium saucepan. In a separate bowl, lightly whisk the egg yolks and milk.
- Step 5: Slowly add the egg and milk mixture to the saucepan, whisking constantly to prevent lumps. Cook over medium heat, stirring constantly until the mixture thickens and just starts to bubble. Remove from heat immediately.
- Step 6: Stir in heavy cream, butter, and vanilla extract until smooth and glossy. Pour the filling into the prepared pie crust.
- Step 7: Bake the pie at 350°F (175°C) for about 35–40 minutes or until the filling is set but still slightly wobbly in the center. Cool completely on a wire rack, then refrigerate for at least 3 hours before serving.
- Step 8: If desired, whip the cold heavy cream with powdered sugar, vanilla extract, and optional maple syrup until soft peaks form. Spread or pipe the whipped cream over the chilled pie just before serving.
Tips & Variations
- Use high-quality pure maple syrup, preferably Grade A Dark Robust, for the best depth of flavor in the filling.
- For extra flakiness, handle the dough as little as possible and keep the butter very cold.
- If you prefer a deeper caramel flavor, add a tablespoon of dark brown sugar to the filling mixture.
- Try topping the pie with toasted pecans or a sprinkle of cinnamon for added texture and warmth.
Storage
Store the pie covered in the refrigerator for up to 4 days. The crust may soften slightly but will remain enjoyable. To serve, let the pie sit at room temperature for about 15 minutes. Leftover slices can be reheated gently in a warm oven (around 300°F or 150°C) for 5–7 minutes if desired. The whipped cream topping is best added fresh each time.
How to Serve
Serve this delicious recipe with your favorite sides.
FAQs
Can I use regular pancake syrup instead of pure maple syrup?
It’s best to use pure maple syrup for authentic flavor and proper texture in the filling. Pancake syrup is mostly corn syrup with artificial flavors and won’t provide the same richness or sweetness balance.
Can I make the pie crust ahead of time?
Yes, you can prepare the pie crust dough up to 2 days ahead and keep it wrapped and chilled in the refrigerator. Alternatively, freeze the dough for up to one month. Just thaw overnight in the fridge before rolling out.
PrintMaple Cream Pie Recipe

This Maple Cream Pie is a luscious and comforting dessert featuring a flaky all-butter crust filled with a rich, creamy maple custard. Sweetened naturally with pure maple syrup and enhanced with vanilla, this pie is perfect for showcasing the warm, earthy flavors of maple in a silky smooth filling, topped optionally with lightly sweetened whipped cream for extra indulgence.
- Prep Time: 30 minutes
- Cook Time: 30 minutes
- Total Time: 5 hours (including chilling time)
- Yield: 8 servings 1x
- Category: Dessert
- Method: Baking
- Cuisine: American
Ingredients
For the All-Butter Pie Crust:
- 1 ½ cups (190g) All-Purpose Flour
- ½ teaspoon Salt
- ½ cup (113g) Unsalted Butter, very cold and cut into ½-inch cubes
- ¼ cup (60ml) Ice Water, plus more if needed
For the Maple Cream Filling:
- ¾ cup (180ml) Pure Maple Syrup (Grade A Dark Robust preferred)
- ¼ cup (50g) Granulated Sugar
- ¼ cup (30g) Cornstarch
- ½ teaspoon Salt
- 4 Large Egg Yolks, at room temperature
- 2 cups (480ml) Whole Milk
- ¼ cup (60ml) Heavy Cream
- 2 tablespoons (28g) Unsalted Butter
- 1 ½ teaspoons Pure Vanilla Extract
For Optional Whipped Cream Topping:
- 1 cup (240ml) Heavy Cream, very cold
- 1–2 tablespoons Powdered Sugar (Confectioners’ Sugar), to taste
- ½ teaspoon Pure Vanilla Extract
- Optional: 1 tablespoon Pure Maple Syrup
Instructions
- Prepare the Pie Crust: In a large bowl, combine the all-purpose flour and salt. Add the cold, cubed unsalted butter and use a pastry cutter or your fingers to cut the butter into the flour until the mixture resembles coarse crumbs with pea-sized pieces of butter. Gradually add the ice water, one tablespoon at a time, mixing gently until the dough just comes together. Avoid overworking to keep the crust flaky. Form the dough into a disc, wrap in plastic wrap, and chill for at least 1 hour.
- Roll Out and Bake Crust: Preheat your oven to 375°F (190°C). On a lightly floured surface, roll the chilled dough into a 12-inch circle. Carefully transfer it to a 9-inch pie dish, trim and crimp the edges as desired. Prick the bottom with a fork to prevent bubbling. Line the crust with parchment paper and fill with pie weights or dried beans. Bake for 15 minutes, remove the weights and parchment, then bake an additional 10-12 minutes until golden and cooked through. Let cool completely.
- Make the Maple Cream Filling: In a medium saucepan, whisk together the granulated sugar, cornstarch, and salt. Gradually whisk in the whole milk until smooth. Heat the mixture over medium heat, stirring constantly, until it starts to thicken and bubble gently.
- Temper the Egg Yolks: In a separate bowl, whisk the egg yolks. Slowly pour about one cup of the hot milk mixture into the yolks while whisking constantly to temper them and prevent curdling. Then, pour the yolk mixture back into the saucepan with the remaining milk mixture.
- Cook the Filling: Continue to cook over medium heat, stirring constantly, until the custard thickens further to a pudding-like consistency. Remove from heat, then stir in the pure maple syrup, heavy cream, unsalted butter, and pure vanilla extract until smooth and glossy.
- Assemble the Pie: Pour the warm maple cream filling into the cooled pie crust, spreading evenly. Cover with plastic wrap, placing it directly on the surface of the filling to prevent a skin from forming. Chill in the refrigerator for at least 4 hours or until completely set.
- Prepare Whipped Cream Topping (Optional): In a chilled mixing bowl, beat the cold heavy cream with powdered sugar and vanilla extract until soft peaks form. For extra maple flavor, gently fold in 1 tablespoon of pure maple syrup. Spread or pipe the whipped cream over the set pie before serving.
- Serve: Slice the chilled Maple Cream Pie and serve on its own or with additional whipped cream if desired. Enjoy this creamy, sweet, and satisfying dessert that perfectly balances cozy maple flavors with a delicate flaky crust.
Notes
- Use pure maple syrup for authentic flavor; avoid pancake syrups that contain high fructose corn syrup and artificial flavors.
- Make sure butter is very cold in the crust to achieve a flaky texture.
- Allow eggs to come to room temperature before using to prevent curdling during tempering.
- Chilling the pie well is crucial for the filling to set properly and slice cleanly.
- Reserve egg whites for another recipe, such as meringue cookies or an omelet.
- Whipped cream topping is optional but adds a lovely light contrast to the rich filling.
- You can prepare the crust and filling a day ahead for convenience.
Keywords: maple cream pie, maple dessert, homemade pie, cream pie, all butter crust, custard pie